
How to create an exam
/docs/Exams/step-by-step
1) Add Subjects
Menu: Exams/Tests » Subjects
The subjects should be subjects only. E.g. Qur'aan, Hadeeth, Fiqh. It doesn't matter if there's many levels and syllabuses for the subject, only the root subject name is required per entry.
2) Add Subjects
Menu: Exams/Tests » Tests & Exams and click + Add Exam
Exam Type: Official or Progressive Test (please see how it works)
Exam Name: Enter an identifiable name for the exam. E.g. End of year 2019
Exam Date: Enter the date of the first exam so it's included in the end of year report when you select the report date. If report date is 24th, any exam on 24th or earlier will be included in the report.
Save the exam. Your exam is now created. Next step is create the tests for subjects for all classes.
3) Create Tests for Subjects
Menu: Exams/Tests » Tests & Exams and click edit tests
From this page you can create all the tests taking place for this exam for all classes and subjects.
This page is organised by subjects. For each subject, the classes will be listed.
Simply tick the ones taking that subject, change the teacher if it's not their teacher taking the exam in which case the results can be added by the teacher you specifiy.
Specify if it's written, oral or other (not important but good for your reference) and set the max marks.
For max marks, you can also use the button at the top to set the max marks for every subject individually so you don't have to type it repeatedly.
Once it's all filled, click "Save All Exams" and the onces you selected will be created. If you editing and you have unticked one then the same button will remove those also.
To modify a single exam, you can save them individually also by clicking on Save {SUBJECT} Tests button.
When you have saved it, it is best to navigate away from the page to ensure you don't accidentally create duplicates.
COMPLETE
Entering Results
This can be done from:
- Admin end under Exams/Tests > view/add results
- Teachers can add the results also if the exam is not "closed"
- When the results are entered, remember to close the exam using the button in the top right corner. Only then will results be available to parents and for use in repors.
Video Tutorial
More Information
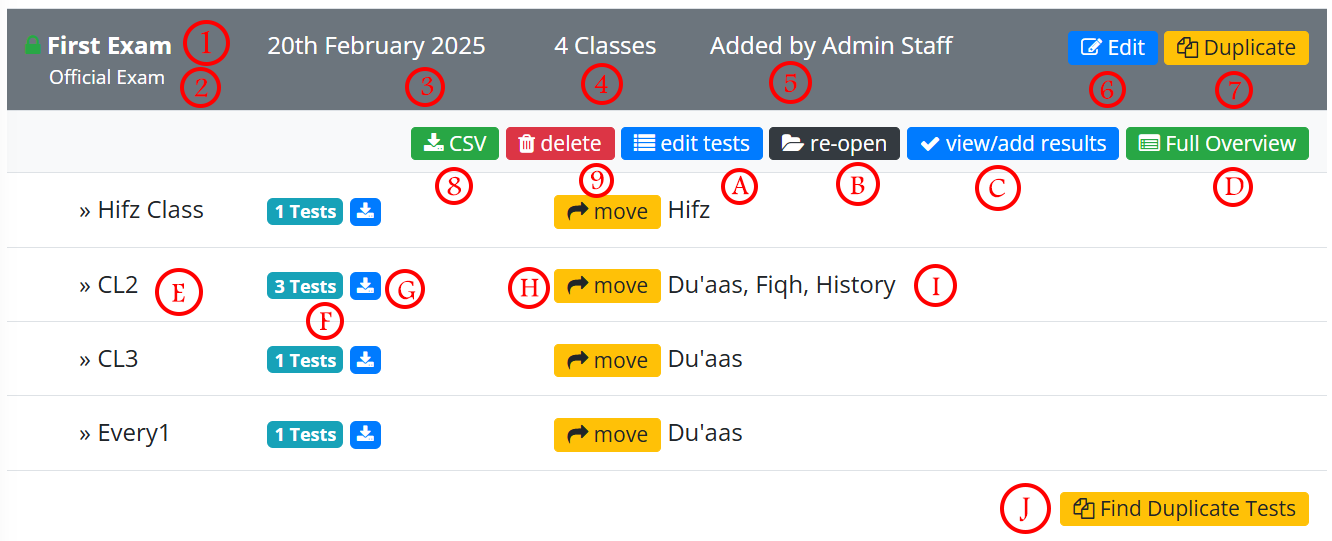
| 1 | Name of the exam |
| 2 | Type of exam whether it's official or progressive |
| 3 | Date of the exam. For the exam to show on the reports, this date must fall within the dates of the report. |
| 4 | Total number of classes taking the tests in the exam |
| 5 | Which admin staff added the exam |
| 6 | To edit the settings of the exam |
| 7 | To duplicate the exam as a new exam copying all the classes and tests over. |
| 8 | To download a CSV file of all the exams |
| 9 | To completely delete the exam from the database. This cannot be undone. |
| A | To specify which classes are taking tests in the subjects added to the system |
| B | To Close/Lock or Re-open an exam. |
| C | To view and add results |
| D | A full overview of all the tests |
| E | Class names |
| F | Number of tests for that class |
| G | To download a PDF of that class' results |
| H | To move the test to another exam |
| I | List of subjects the class is taking tests for |
| J | To locate and remove duplicate tests that might have been added by accident |