School (Set up)
Students
Classes
Contacts
Registers
Teacher Logs
Fees
Teacher/Parent Portals
Homework & Diaries
Exams & Tests
End of term/year reports
Events
Products
SMS Features
Merits/Certificate
F.A.Q.

|
Help Guides |
Adding Fees to the system
There are multiple ways to add fees to the system.
How it works:
Fees are paid against invoices already generated or created on the system. Please see the topics How it works and Creating invoices for more information on this. If the invoices are in place then you can use any of the methods below to add fees for the students.1. By searching the student
- Fees page search
- Go to Fees Dashboard and use the search field to find any student for fees.
- Click the name in the search results to add fees
- Global search
- Using the search field on the left menu, type the student name, surname, date of birth or any part of these to find the students.
- On the results page, locate the student if there's more than 1 result and click on Options
- And in the dropdown click on Fees
- You will now see a page filled with the students invoices. Check the invoices that are outstanding and click on Add Payment for the invoice.
Note, you can also use this page to view the fees report, modify invoices and transfer fees from one invoice to another.
2. Add multiple payments using CSV import
- From Fees Dashboard, click the Import Fees button
- Follow the steps described on the page for accurate results
- Click Download CSV Template
- You will now have a pre-filled CSV file with all the outstanding invoices
- Simply add the payments received
- You can duplicate the csv rows to add 2 payments for the same invoice
- The full details are described on the page
3. From the Class list
- On the fees dashboard under Class Fees click any class
- Switch between Overdue Invoices, Current and Upcoming buttons to find the invoice you wish to add fees to
- Overdue Invoices
These are invoices that are overdue meaning the invoice date's period ending has already passed - Current Invoices
These are active invoices meaning the period is currently ongoing - Upcoming Invoices
These are invoices where the period dates have not yet commenced.
- Overdue Invoices
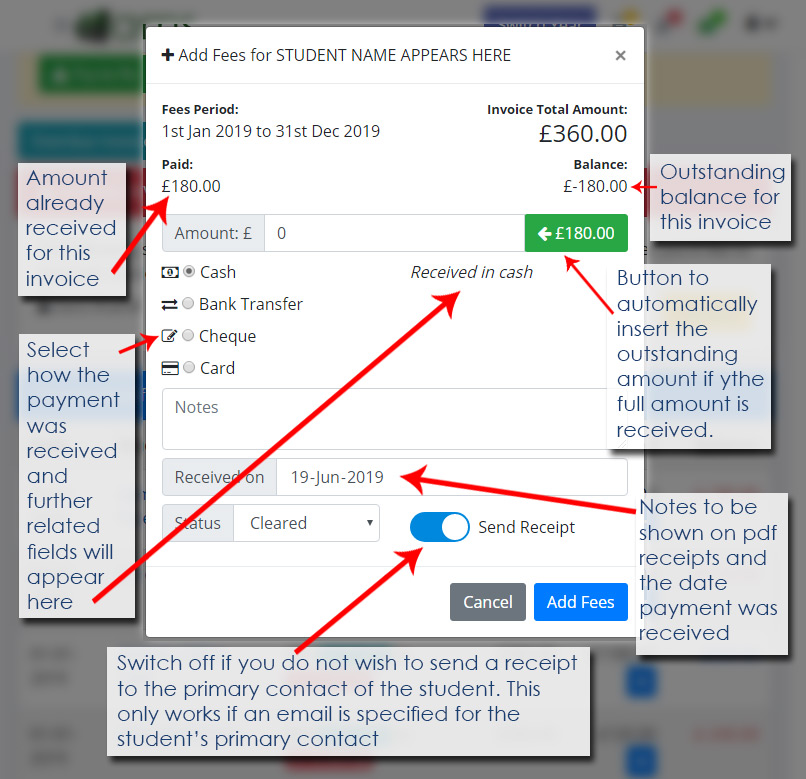
- Click the plus icon next to the received amount to open the Add Fees interface in order to add the fees.
3. The Add Fees Interface
